Connect your AI assistant to Pluto
Last updated: October 7, 2026
The Pluto Bio connector lets your AI assistant work with your Pluto organizations, programs, datasets, and analysis spaces. Ask a question in plain language and your assistant looks up the answer in Pluto for you.
Connector URL: https://pluto.bio/mcp
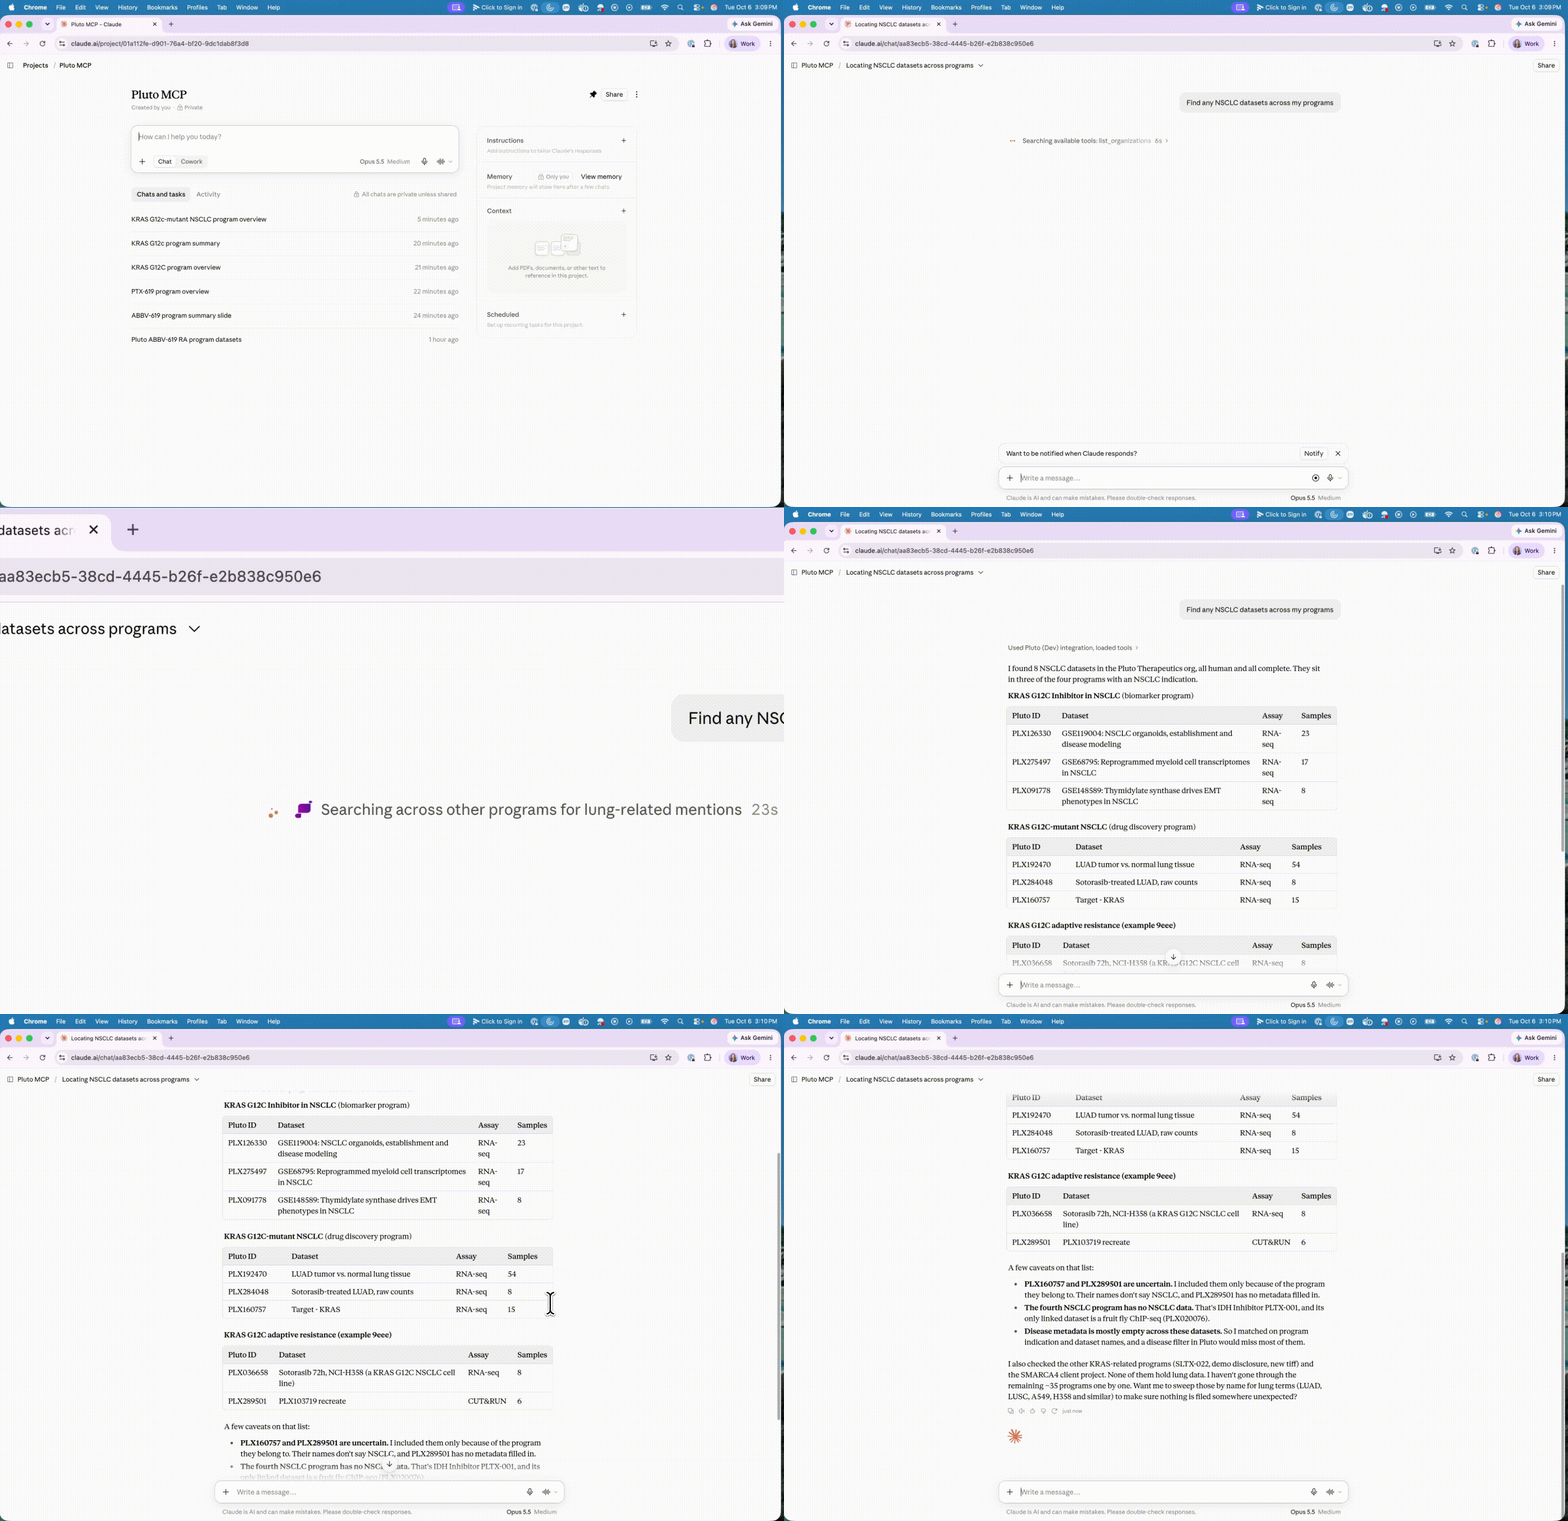
Works with your AI assistant
Pluto's connector is a standard remote MCP (Model Context Protocol) server. It works with any AI assistant that supports custom MCP connectors with sign-in, such as Claude. Menu names differ between assistants, but the settings are the same everywhere. This guide uses Claude for the screenshots and examples.
How setup works
Admin, one time: an admin adds the Pluto Bio connector to your organization's AI workspace. This takes about two minutes.
Every user: each person connects their own Pluto account, then turns Pluto Bio on in a chat.
Before you start
You need a Pluto account. Your assistant only sees what your Pluto account can already see, in the organizations you belong to.
Your assistant must support custom (remote) MCP connectors with OAuth sign-in.
The connector works with your Pluto data.
If your organization already has Pluto Bio set up, skip to Connect your Pluto account.
Connector settings
Use these values in any assistant. The steps below show where they go in Claude.
Setting | Use | Why |
|---|---|---|
Name |
| Any name works. This is what appears in your connector list. |
URL |
| Include |
Authentication | OAuth sign-in, up front | Every Pluto tool needs a Pluto account. Pluto rejects requests without a sign-in. |
OAuth client | Automatic registration (DCR) | Pluto supports dynamic client registration. Nothing to set up. |
Request headers / API key | Leave empty | Each user's sign-in provides the token. Don't add an |
Transport | Streamable HTTP | If your assistant asks. Pluto doesn't serve SSE. |
Add the connector (admin, one time)
You only do this once for your organization. After that, members connect with their own Pluto sign-in. Example shown: Claude.
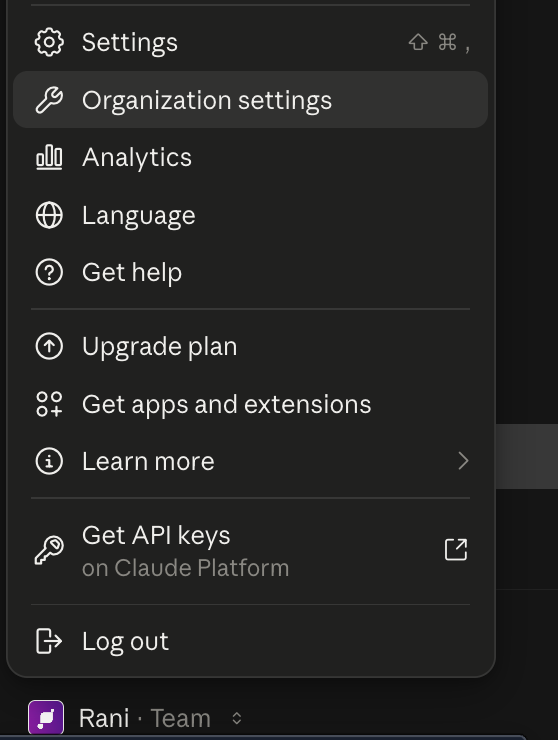
1. Open your organization's settings
In Claude, click your name in the bottom-left corner to open the profile menu, then choose Organization settings.
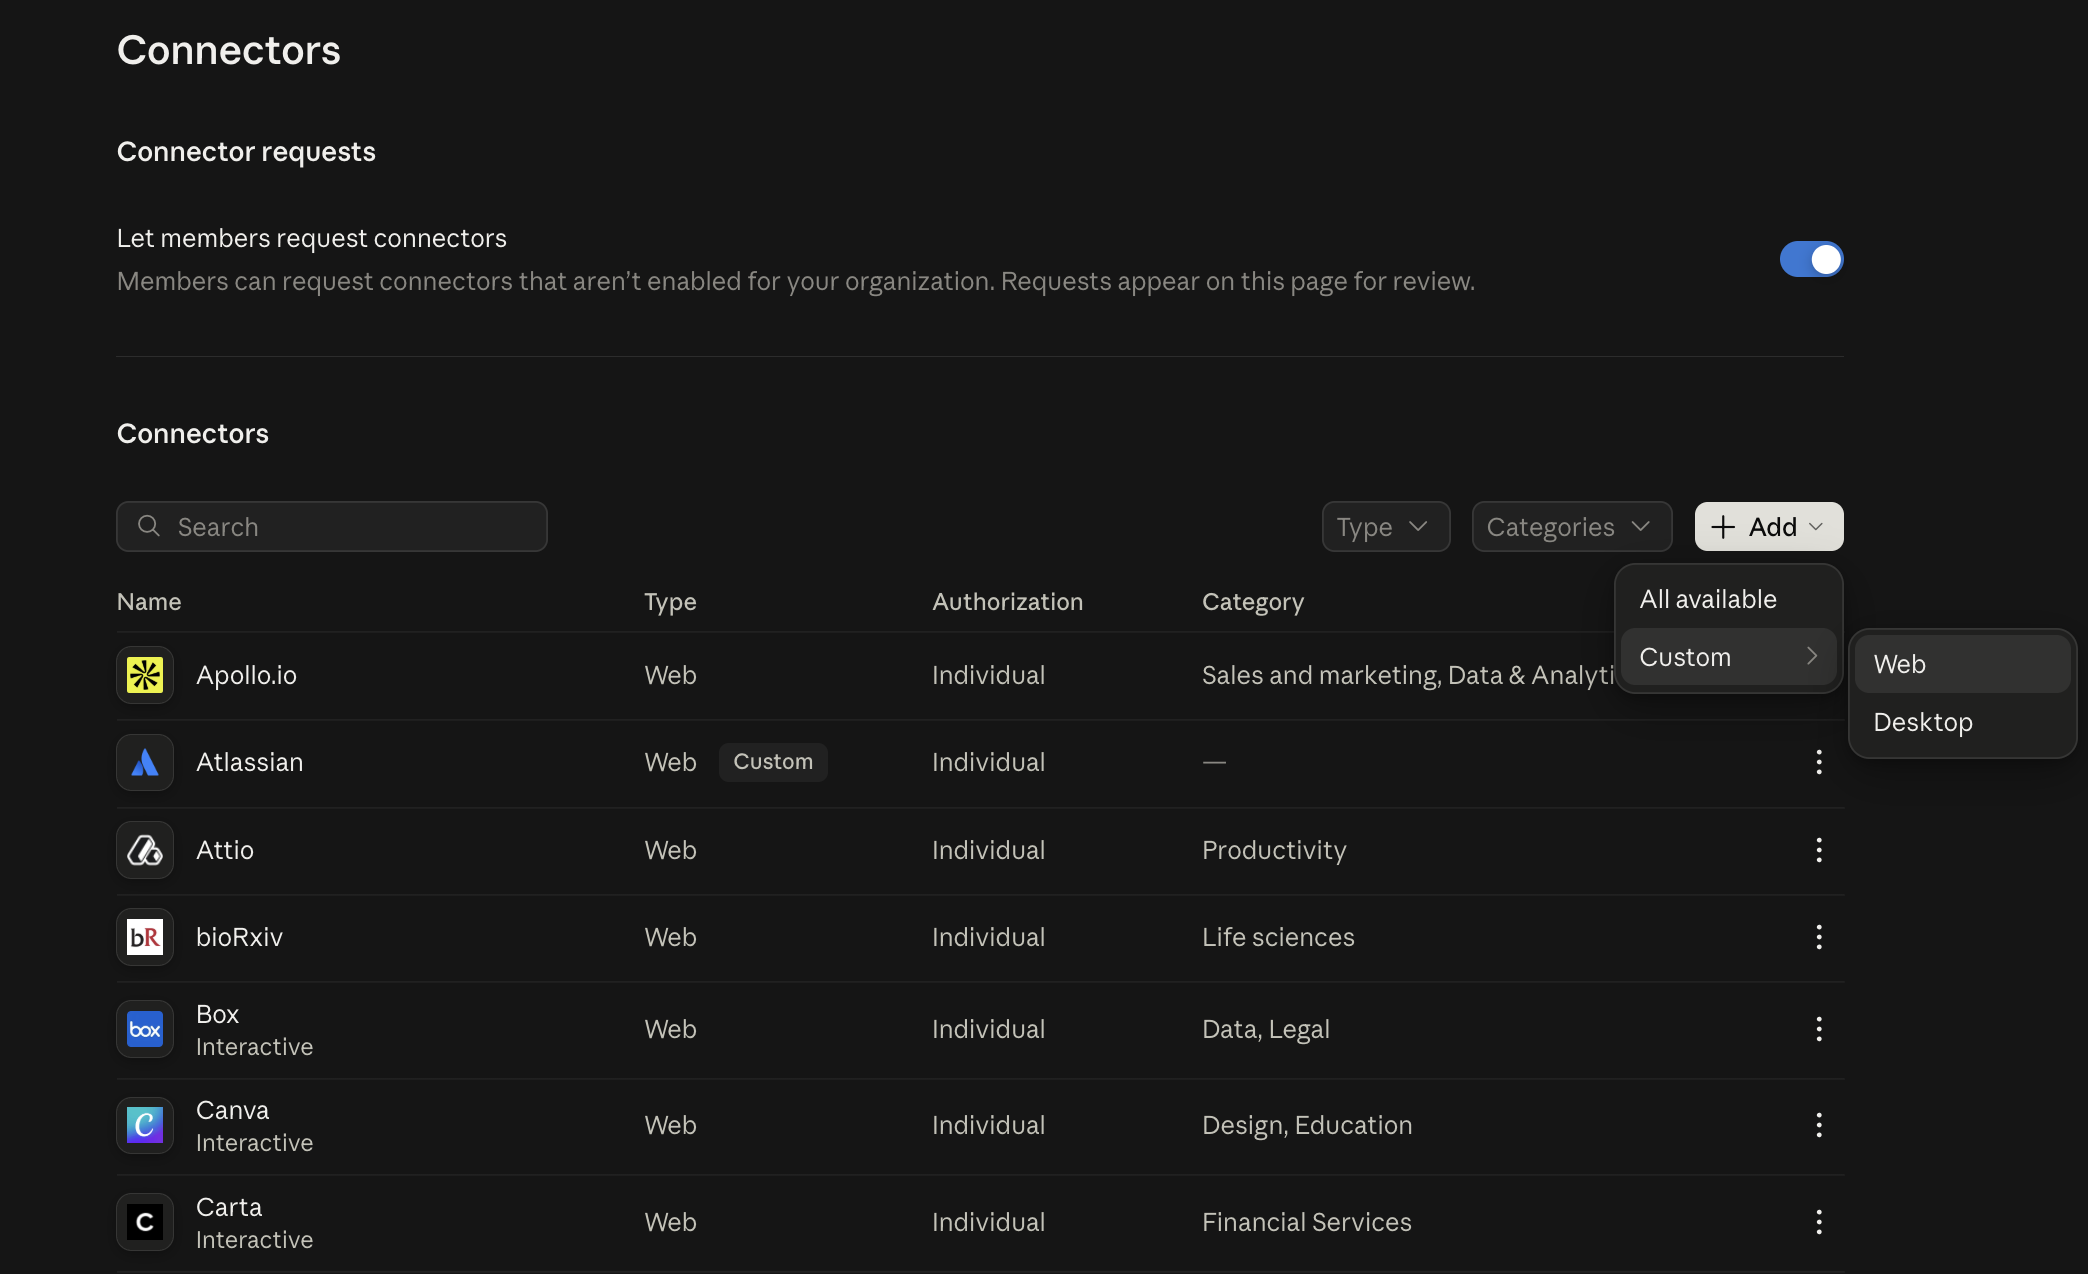
2. Add a custom connector
Go to Connectors. Click Add, then choose Custom > Web.
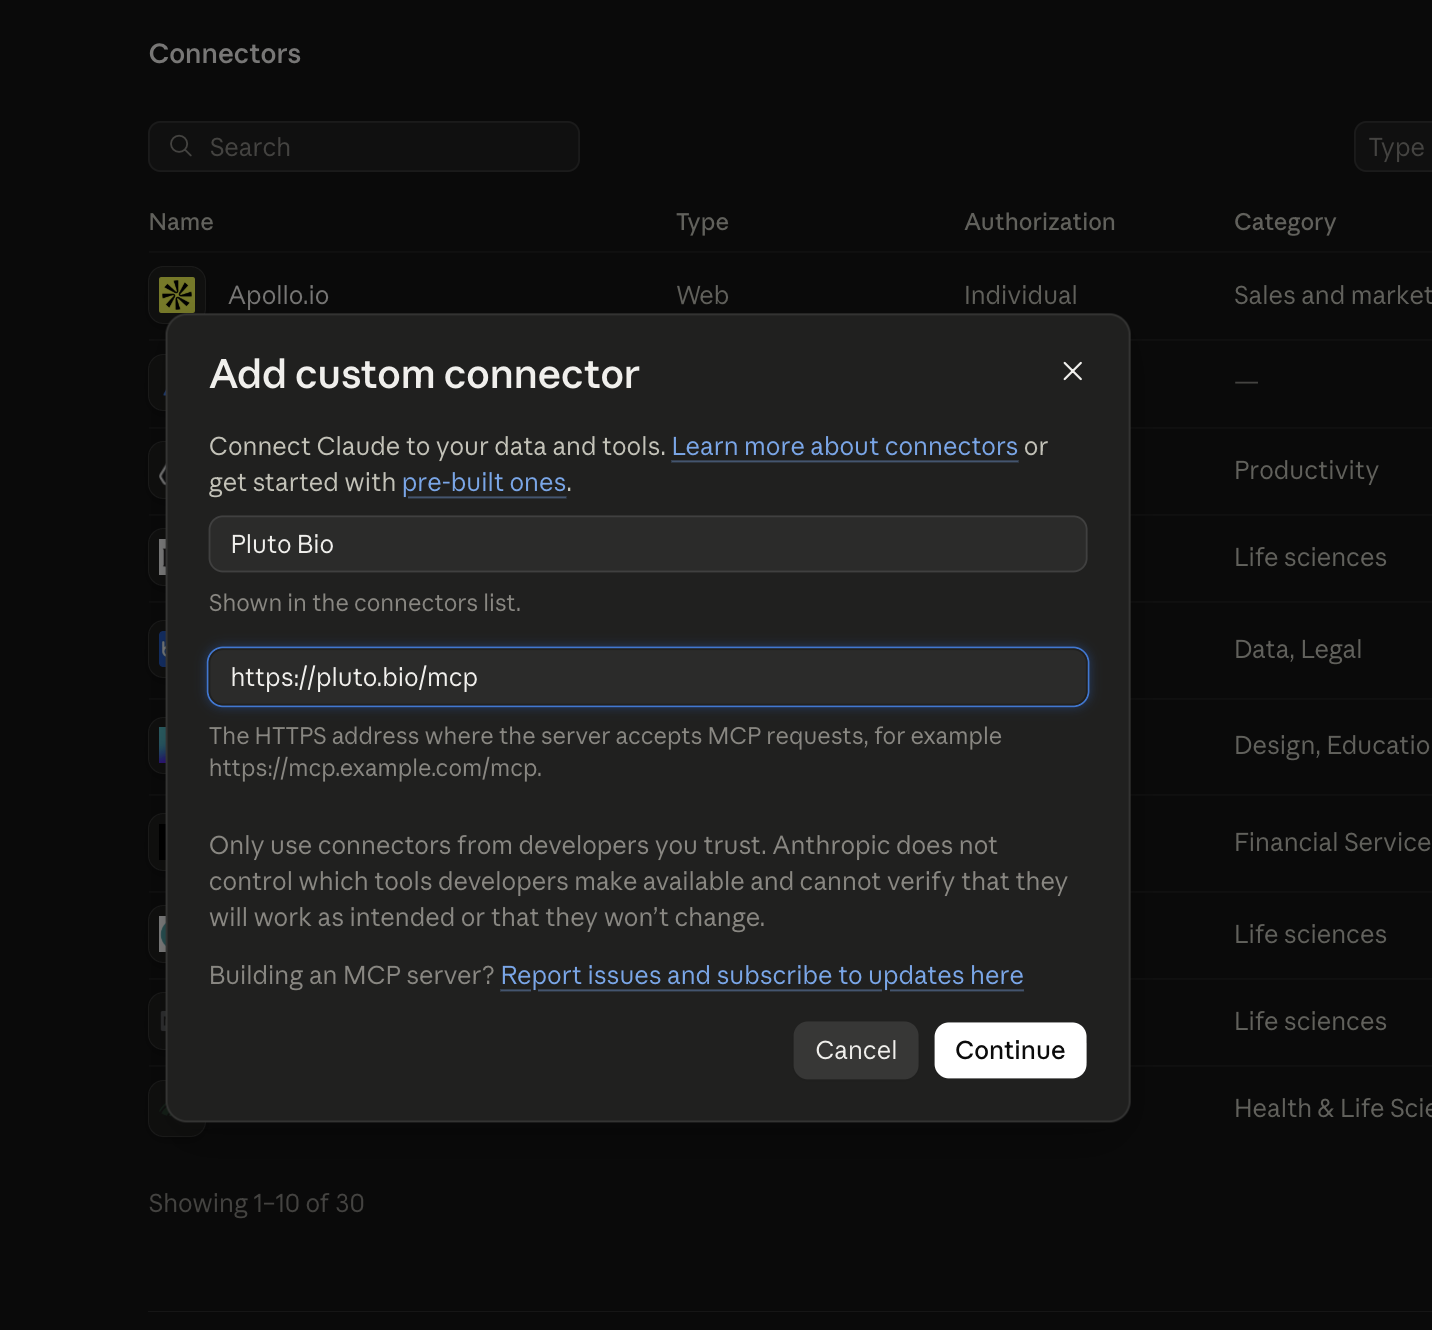
3. Name it and paste the URL
Enter Pluto Bio as the name and https://pluto.bio/mcp as the URL, then click Continue.
4. Keep the detected settings and click Add
Claude checks the server and marks the options it detects. Pluto's detected options are the right ones: Sign in now and Register automatically. Leave request headers empty, then click Add.
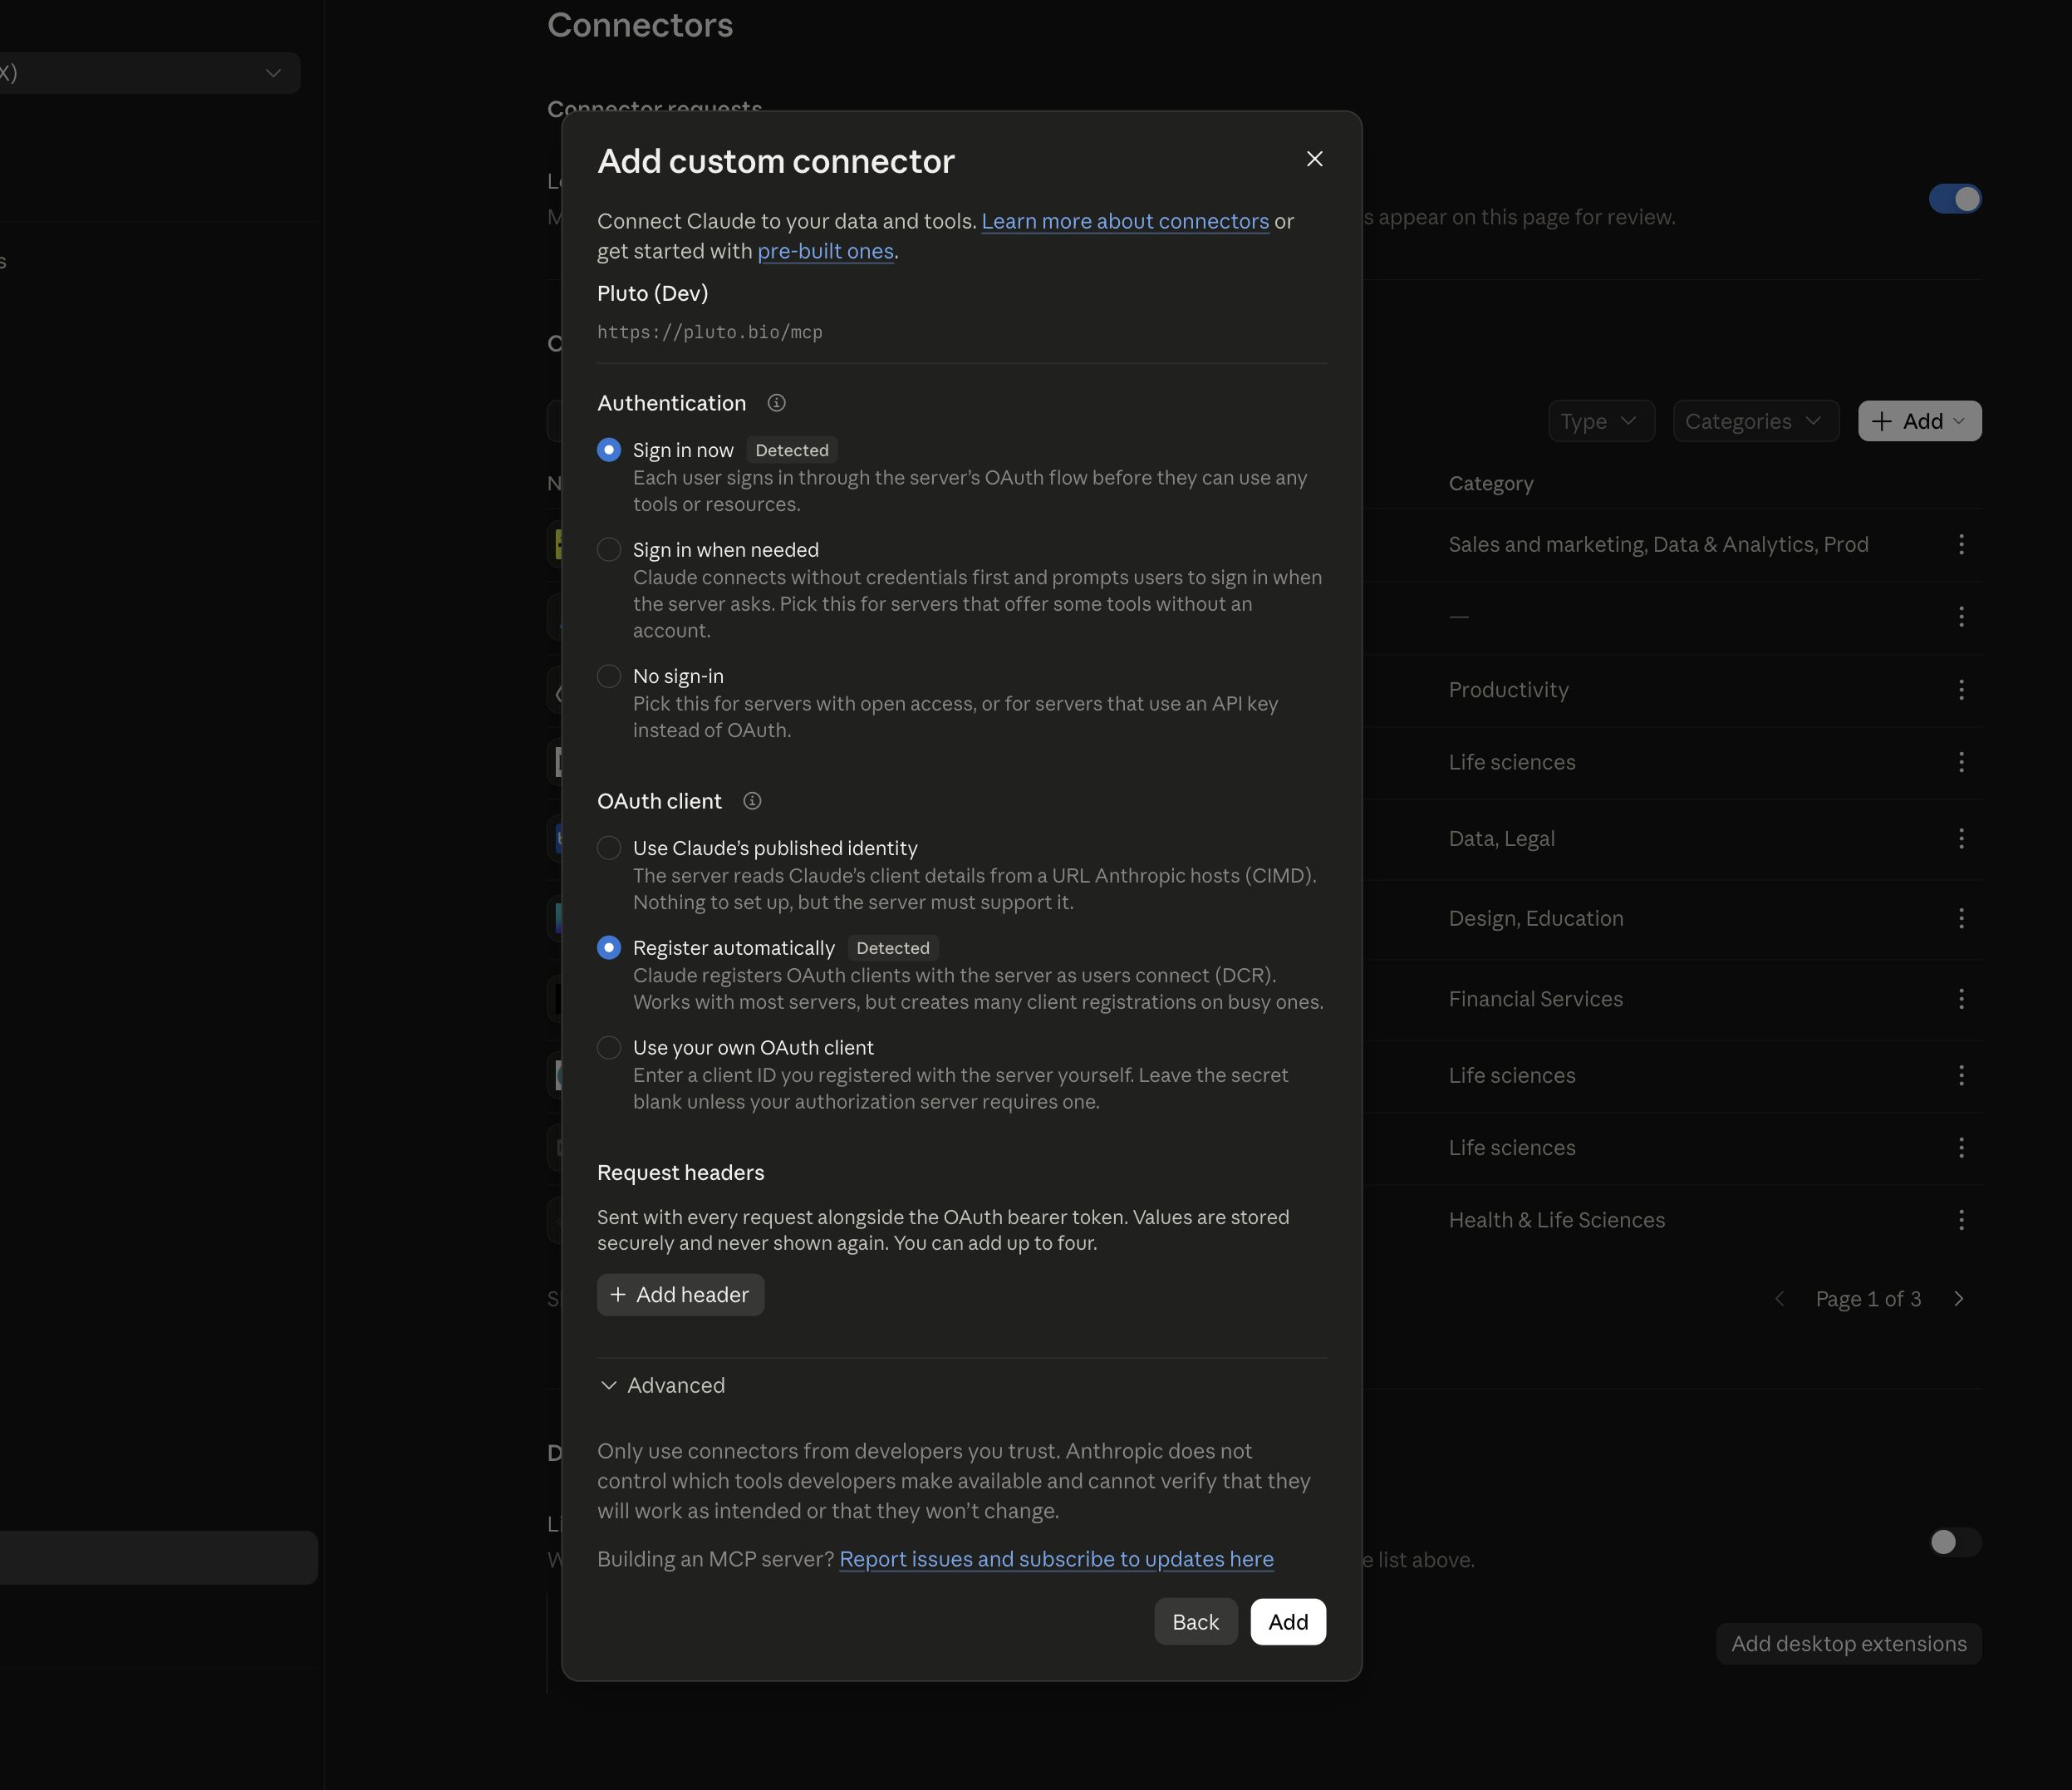
The screenshot shows a test connector name. Yours will say Pluto Bio.
Options to skip in Claude:
Sign in when needed and No sign-in: Pluto has no tools that work without an account.
Use Claude's published identity: Pluto doesn't support this yet, so the connection would fail.
Use your own OAuth client: only needed if Pluto support gave you a client ID.
Using a different assistant, or an individual plan? Look for an option to add a custom or remote MCP connector in your assistant's settings, then enter the values from Connector settings. On individual plans you can usually add the connector for yourself and continue below.
Connect your Pluto account (every user)
Once the connector is added, each user signs in with their own Pluto account.
1. Find Pluto Bio in your connectors
Open your assistant's connector settings and search for Pluto Bio. Use search rather than adding a new connector, since it already exists for your organization.
In Claude: Settings > Connectors, then type Pluto Bio in the search box.
2. Click Connect
On the Pluto Bio connector page, click Connect. A browser tab opens for Pluto.
3. Sign in and allow access
If you're signed out of Pluto, sign in first. You'll then see Pluto's consent screen.
Check that the return address belongs to your AI assistant's provider, then click Allow. If you see an address you don't recognize, click Cancel and contact support.
In Claude, the return address is https://claude.ai/api/mcp/auth_callback.
4. Turn it on in a chat
Back in your assistant, the connector shows as connected. In a new chat, turn on Pluto Bio, then try one of the prompts below.
In Claude: open the tools menu in the message box and switch on Pluto Bio.
Read-only or read and write
You decide whether your assistant can make changes in Pluto.
On the consent screen: a separate checkbox asks whether the assistant may make changes in Pluto. Uncheck it to keep access read-only. Your assistant can still look everything up.
The first time each tool runs: most assistants ask before using a tool. Allowing lookup tools every time is reasonable. For the three tools that create things, approve each use so you can review the change first. In Claude these choices are Allow once and Always allow.
You can usually change these choices later in the connector's settings. None of the Pluto tools delete or overwrite anything.
Prompts to try
Start with the first one. The others build on it, and your assistant finds the IDs it needs on its own.
Which Pluto organizations do I belong to?List the programs in [your organization], 5 at a time, and show me the second page.Pick one of those programs and summarize its datasets and analysis spaces.Open the first dataset in that program and tell me its organism and pipeline status.Find any NSCLC datasets across my programs.
What your assistant can do
Look things up
Tool | What it does |
|---|---|
| The organizations you belong to. Your assistant starts here. |
| Which Pluto account results are scoped to. |
| One page of programs in an organization, searchable. |
| One program's summary. |
| The datasets linked to a program. |
| One dataset by UUID or Pluto ID. |
| A profile of a dataset's sample data. |
| A program's analysis spaces. |
| One analysis space by UUID or Pluto ID. |
| The datasets linked into an analysis space. |
Make changes (creates in Pluto)
Tool | What it does |
|---|---|
| Creates an analysis space in a program. |
| Prepares an upload of a result file for a new analysis. |
| Creates an analysis in an analysis space from uploaded files. |
If you declined changes on the consent screen, Pluto refuses these.
Troubleshooting
What you see | What to do |
|---|---|
Connect does nothing, or fails right away | Ask your admin to check that the URL is exactly |
After sign-in you land in the Pluto web app, not the consent screen | Close the tab and click Connect again while signed in to Pluto. |
A warning icon or Reconnect in your connector list | Your Pluto sign-in expired or was revoked. Click Reconnect and allow access again. |
Your assistant can't see a program you know exists | Ask it which organization it used. It sees only what your account can see, one organization at a time. |
Your assistant says it isn't allowed to make a change | You declined changes on the consent screen. Disconnect, connect again, and leave the changes box checked. |
Pluto Bio doesn't show up in your connectors | Your organization hasn't added it yet. Ask an admin to follow Add the connector. |
Anything else | Email support@pluto.bio and tell us which step it stopped at. |